


I’ve been doing a lot of reflecting about pretty and organized kitchens. I know a lot of us tend to strive for this utopia of a place (I’m guilty of this for sure) but now that I have a little one and am always making meals, bottles, snacks, cleaning up messes (after my little guy has rummaged through the cabinets), looking for pots and baby utensils, I’ve grown quite close to the kitchen. My relationship with the kitchen has evolved, as I’ve come to care more about function and durability.
Would you believe me if I told you we renovated our kitchen in two weeks? Well hold onto your knickers, because that’s exactly what happened here. Last we left off, my husband and I were knee–deep in an infested kitchen with water damage and learning a new city. This kitchen renovation was very similar to our last one, so we understood the importance of sourcing materials for a kitchen with an emphasis on durability. Though I’m all for a beautiful kitchen reveal, I am a big believer in curating a space that will stand the test of time, and function well for normal day-to-day use.
BAR HEIGHT OR COUNTER HEIGHT?


Book Easel (vintage) | Scalloped Plates | Copper French Press & Coffee Storage | Egg Holder | Polished Brass Bars (vintage/antiqued) | Copper Pots and Utensils (vintage/antiqued) | Outlet Cover
In my experience, the key to completing a renovation or design project quickly is to be decisive, along with considering how you’ll use the space. Having product knowledge from previous kitchen renovations also helps a ton. When it comes to sourcing products, I love to use my past experience (good and bad) with appliances, fixtures, and flooring. Moreover, my husband and I are planning to rent this space out next year, so it was important that we think through how our tenant would utilize the kitchen, in addition to how we’d be using the space. One of the decisions we had to make early on, was whether we should keep the height of the breakfast bar or take it down to a counter height, so I took to my Instagram to ask people for their experience with this sort of setup. With 81% of people voting to cut the bar wall down (and for good reasons), we decided to go this direction and bring it down to a counter height. A special thank you to all of you amazing folks who shared why we should go this route. It was important for me to know what layout people typically prefer. Many shared how they loved the idea of cleaning one surface instead of breaking it up into two. Some shared that they preferred a counter height because it; creates a larger work surface, makes it easier for short people to sit up to the counter, feels more inviting, and it would be easier to see out into the dining area. Aesthetically, I love counter height for a cohesive and cleaner site line. Even though we went in this direction, I received some very good reasons as to why people love a bar-height situation for instance: if there is a sink in this area, having the backsplash up against a bar height sitting area really helps, hiding cooking messes from guests, and separating the counter space for keys and tchotchkes. Let’s get into the floors we chose.
THE FLOORS

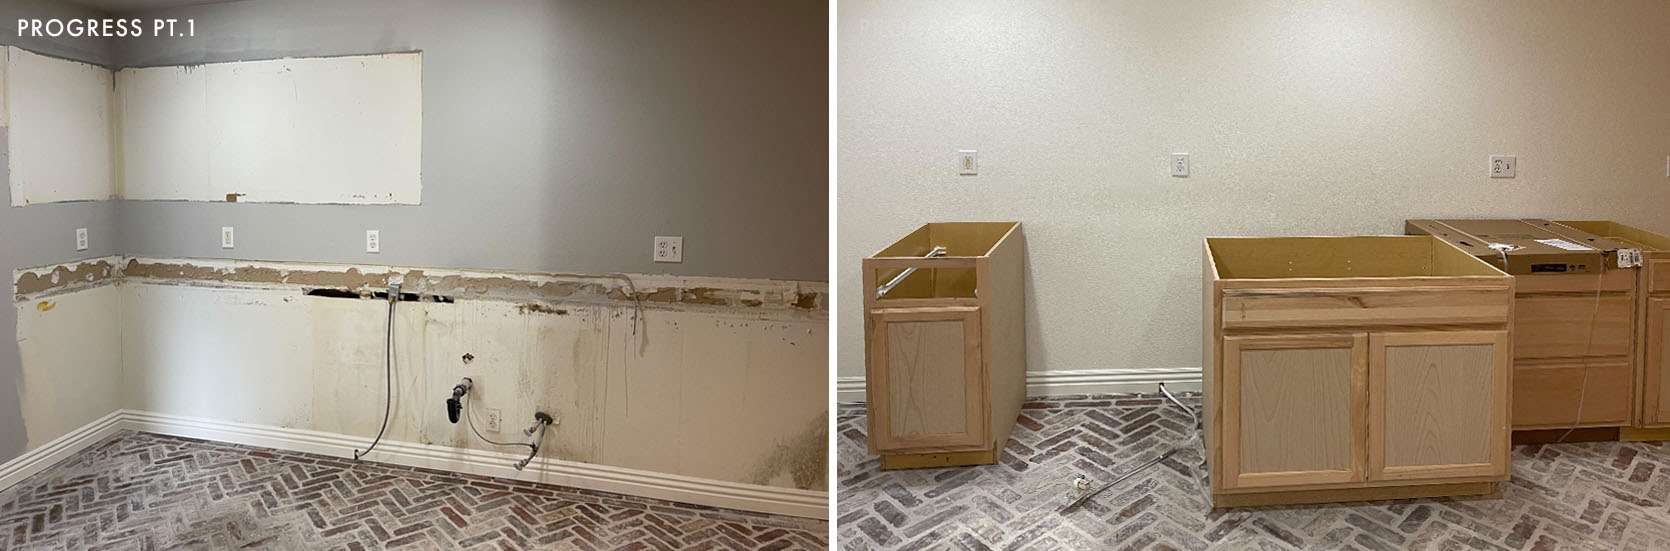
To reiterate, we had to get rid of the laminate floors and kitchen cabinets because of massive water damage. The laminate floors were bubbling and they smelled horrendous. We discovered puddles of water under the floors once they were removed, and hundreds of roaches nesting in the cabinets. Everything was pretty much falling apart, except for the granite countertops, so we donated those to our contractors for them to use on another project. With the previous floors in such bad shape, I wanted to source a floor that could stand up to all knicks, scrapes, and puddles, so I chose a brick because it can withstand extreme conditions. There’s a good reason why we see so many brick floors all throughout Europe with these brick streets and homes lasting for hundreds of years. After install, to turn it up a notch, we had the floors sealed.

Before I get too far into the kitchen reno, I should mention that my husband and I were driving down to Las Vegas once a week from Los Angeles (one-day turn-around trips) to monitor the work being done in the rest of the condo. This was becoming a bit taxing on us, so we quickly decided to move into the condo. We figured we could manage the project easier that way (or so we thought… living in a renovation with a one-year-old was bananas). This is the primary reason we pushed to finish the kitchen sooner rather than later. I was exhausted with cluster feeding our little one and coming up with healthy family meals that didn’t have to be prepared on a stove. All that to say, it was time to get-er-done!
THE CABINETRY

Cabinets | Cabinet Color | Cabinet Pulls | Cabinet Knobs

Our kitchen budget was pretty tight, and after seeing how the renter was living in the condo before we’d purchased it, I was okay with opting for non-designer cabinetry. In fact, I went for an option I’d used for a few other budget-friendly projects (one of those projects being our last home). These cabinets were sturdy in our Atlanta home, and allowed me to customize the space without splurging. I was able to go to our local store, select in-stock cabinets, end panels, kicktoes, soft pulls, etc., and have them delivered the following day.
THE APPLIANCES +

Stove | Hood | Towels (unavailable) | Art (gift to me from my husband’s grandmother)
I ordered a black sink that I love and have used on other projects. It’s perfect for long-term use because you don’t have to worry about cracks, scratches, or discoloration. It’s a pretty large and deep sink too – great for housing and rinsing dishes (which we have plenty of) while prepping for the dishwater. The sink arrived the second to last day of the renovation (we understood our plumbing situation very well, so we saved plumbing for the end). Speaking of dishwashers, these are typically the item with the longest lead time (the stove is one too) so as soon as we closed on the condo, I took measurements of the existing appliances and ordered new ones asap! The current faucet is temporary and will be replaced with a more functional faucet with a spraying ability (this is just the one that had the best lead time, and we grew tired of washing dishes in the bathtub).
The previous owner wanted to take the appliances (which we were completely fine with – seeing as how the originals were being occupied by creepy crawlers). As for the stove, we chose a convection electric range with a back panel. We cook a lot in our household, and we also noticed that every place we’ve ever rented came with this style of range. I should mention I love how quickly these ranges boil water, (makes for faster cooking) and I’m on board with its eco-friendliness. I’m also a fan of easy cleanup.

Dishwasher | Paper Mache Bowl (similar) | Seagrass Baskets (unavailable)

As pretty as no stove back looks, we were constant victims of food falling in between the crack of the backsplash and stove. I’d grown so tired of pulling the stove out and trying to clean behind it. So… feel free to smite me design gods, my husband says we’ll always have a stove with a back panel (he was really the one pulling the stove out all of the time haha..)
Now let’s get to this range hood. We wanted a hood that was simple enough to have a handyman come in to access and/or fix it. This one is a convertible range and doesn’t have any ducting. It’s similar to the one we had in our Atlanta home, which we loved.

Refridgerator | Faux Pothos Plant
We are avid meal preppers and tend to like a lot of space in a refrigerator, so we chose a 28.2 cu.ft. french door refrigerator (I could fit inside of it comfortably during the hot Las Vegas summers). I should also mention that we got a killer bundle deal during Black Friday and didn’t have to break the bank on these appliances, so we’ll be leaving them for our renter. The appliances arrived during the second week of the renovation.
THE COUNTERTOPS
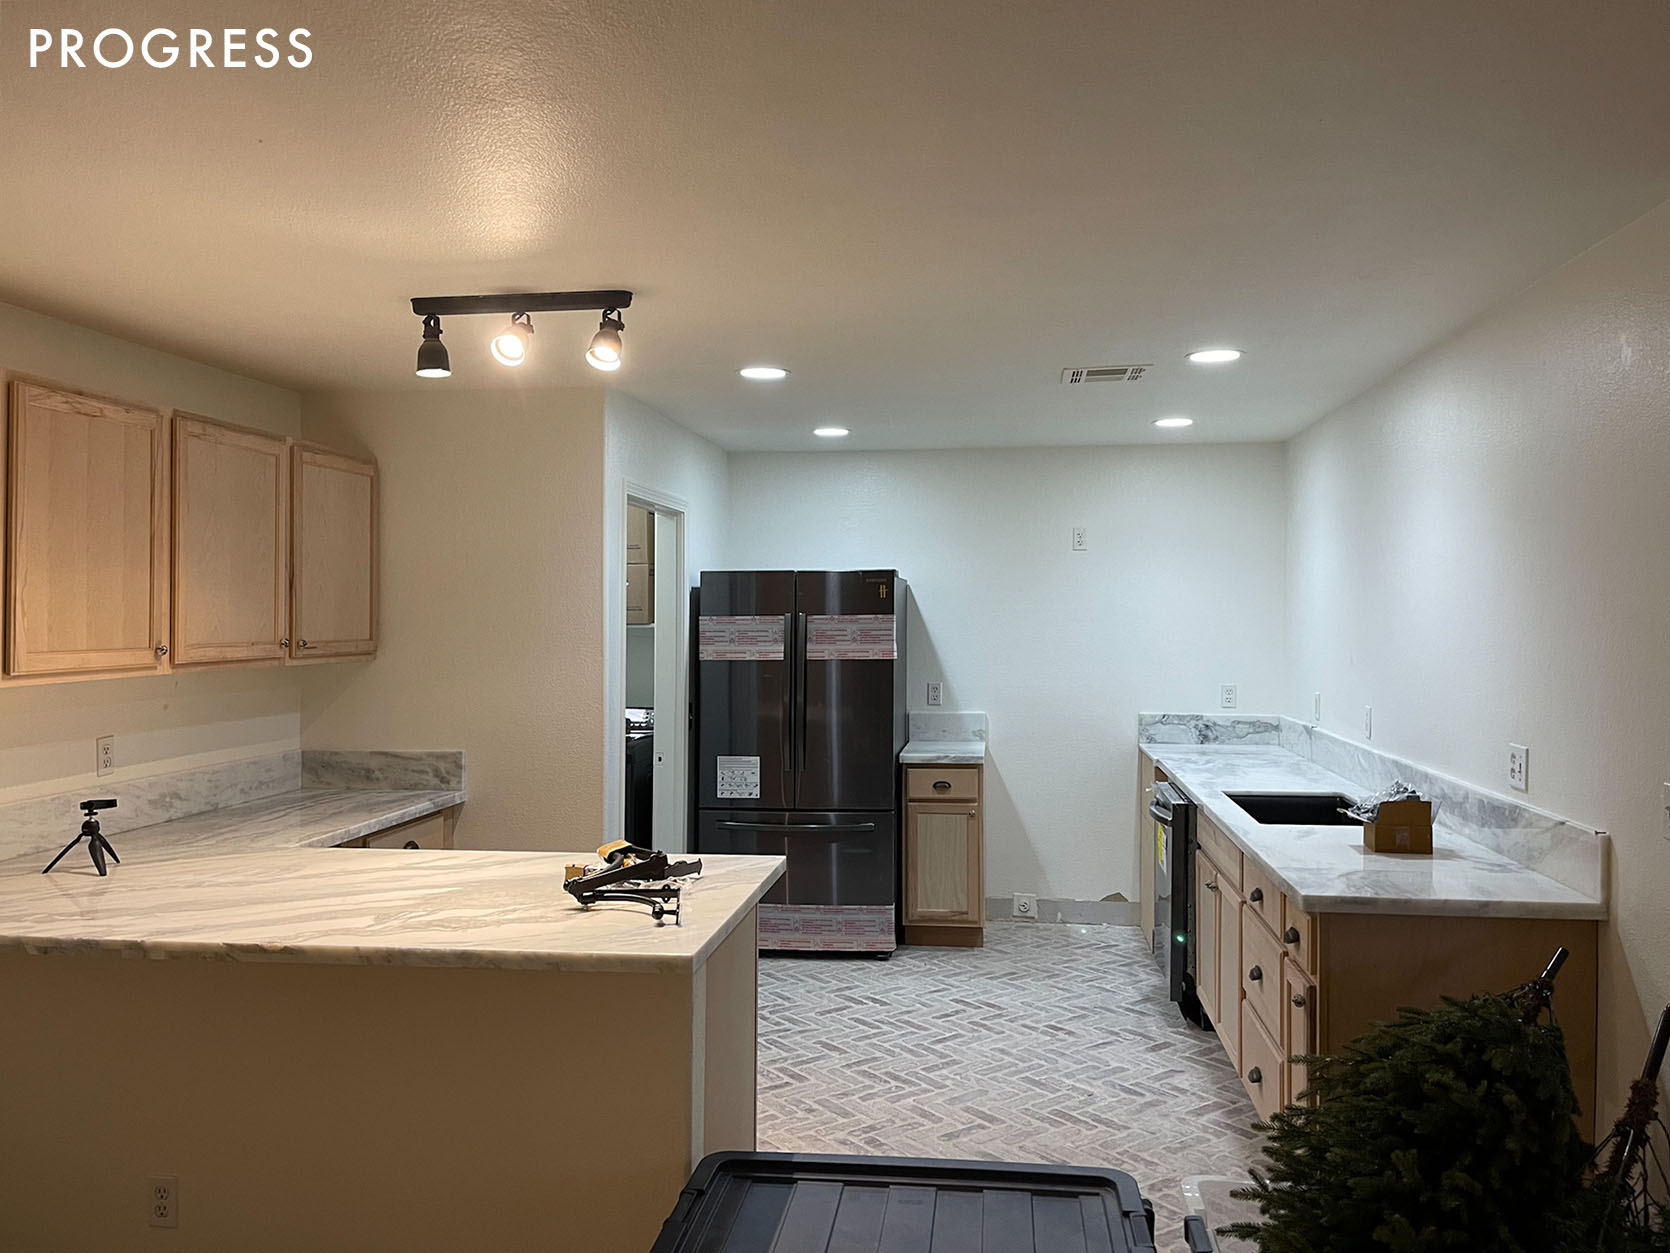


Now here’s where durability gets a bit tricky… we chose marble counters for this kitchen, but hear me out… marble is a strong/sturdy material and the cost of these counters was much more affordable than quartz and granite. I chose all of the salvageable pieces that had minor chips (which my contractors very easily cut around) and I also utilized my trade discount, so these counters were nearly free. When we were leaving the warehouse, I felt like we should have been speeding off. I understand that marble is porous, which is why the counters we chose are sealed. But honestly, I love good ol’ natural material and really don’t mind the aging of this. Given the amazing discount, the counters were the only area of the kitchen I was willing to sacrifice in terms of extreme durability. Nonetheless, the counters are very shiny and are holding up quite well.
THE PRETTY (BUT PRACTICAL) STUFF

Shelf (custom) | Brackets | Vintage Metal Wall Sconce
If you know me, you know that I love an open shelf, but I’ve come to realize just how important it is to have closed uppers for extra storage and food. Not everyone loves their ceramics on display. However, I love easy access to my everyday plates, cups, bowls, glasses, and bread jars. In addition, it was important to me to have a sturdy shelf with good depth to hold the previous items, so I drew up a plan and had my contractor create a custom shelf for me. I had the sconces hung a bit higher so that future renters would have to intentionally access them (less room for bumping this hardware and breaking bulbs). Adjacent to the shelf are upper cabinets, which house our food items. We also have a butler’s pantry off the kitchen/ behind the door. Further why I was okay with creating a long open shelf.


While we are on the topic of cabinets, let’s get into the cabinet colors. I’m a big fan of black cabinetry, especially in high-traffic areas. I was intentional about having the cabinets with all of the appliances next to them painted in“Blackest” by Clare Paint. As for the breakfast/coffee bar, I wanted a warm and light feel in this area, after all, we use this space primarily during the mornings. We took it up a notch with the gloss finish and chose Clare’s “No Filter.” The rest of the kitchen is painted in “Whipped”.
THE BREAKFAST BAR

At the breakfast bar, I’ve repurposed vintage polished brass towel racks to hold our vintage copper pots and utensils (which we actually use to cook and make tea and coffee). I mean it when I say, I like to leave out the items we use every day (I’m all for a grab-and-go), especially in the morning. We’ve just got to cave in and get a toaster (we haven’t had one in years… we fry our toast haha). We also need to invest in a microwave – let me know if you have any good suggestions.
A BREAKDOWN OF “FAST RENO” TIPS
- We’ve covered being decisive in terms of selecting products
- Researching products in advance
- Choosing in-stock cabinets and hardware that are ready to ship
- Ordering appliances in advance because they have the worst lead times
- Try not to relocate the plumbing or cabinetry layout so you don’t have to go through permitting (but this varies from state to state).
- Having good contractors that are knowledgeable and can cut counters and do carpentry onsite to address custom needs in the moment/on install day
- Opt for swapping out lighting instead of installing new light fixtures (in our case, we were able to speed things along with electrical because our contractor was buddy-buddy with the inspector).


I’m still in awe of how quickly this became a place for me and my family to gather comfortably while we cook, laugh, and eat. Along with creating a durable kitchen space, I’m embracing the truth of everyday life. There is so much joy and happy moments that happen in this space, and my goal is to continue normalizing a lived-in kitchen, because that too is beautiful. I hope whoever moves into our condo after us can appreciate what we’ve done here. I believe this kitchen will have a long lifespan. I’ll check back in with you all in about 30 years with an update.
*Design and Photos by Ajai Guyot
The post How Ajai Transformed Her Kitchen In Just 2 WEEKS appeared first on Emily Henderson.